Greetings from Karelia Software!
Sandvox Tip: Advanced Slide Show Techniques
This month, we want to show off a feature that we added to Sandvox back in January — the Slide Show object — but with a twist. Instead of using it as a way to view photos in sequence, we’re going to use it with built-up graphics to rotate through a store’s deals.

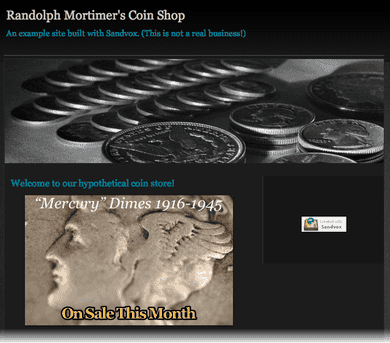
Let’s say that you own a shop for coin collectors, and you’ve set up a website using Sandvox. You have a few specials set up for this month, and you want your site visitors to see these right away. And if they are interested in one of the deals, clicking on the graphic should take them right to a page that will tell them more about the deal. You’ll want your images to transition from one to another, as you see on our demo page.
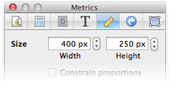 Let’s start by putting the slide show object on your home page. From the “Objects” popup in the toolbar, choose Indexes → Slide Show. We don’t have the graphics yet, but that’s OK. Resize the placeholder for the slide show by dragging the corner handles, or by using the Metrics inspector to pick a specific size. In our example, we’ve chosen 400 pixels wide by 250 pixels high. Let’s start by putting the slide show object on your home page. From the “Objects” popup in the toolbar, choose Indexes → Slide Show. We don’t have the graphics yet, but that’s OK. Resize the placeholder for the slide show by dragging the corner handles, or by using the Metrics inspector to pick a specific size. In our example, we’ve chosen 400 pixels wide by 250 pixels high.
Next, we’ll need to create the series of graphic images. These will probably be made out of images of your product, and some eye-catching text. Each of these images should be the size that we chose in the previous step. You, or a professional artist, will need to build these images using an old standby like Photoshop or the much more easy-to-use Acorn. Save your graphics in JPEG or PNG format to get them ready for Sandvox.
In Sandvox, create a new empty page, and give it a title like “Our Specials”. In the Page Details area, at the bottom of the document window, use the popup menu to change the page type from a “Single Page” to a “Collection”. 
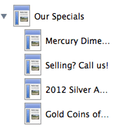 Now create new empty pages, one for each of your special deals, giving each an appropriate title. If the new pages aren’t already part of the “Our Specials” collection, drag them into that collection using the Site Navigator. When done, your collection should look something like this, containing one page corresponding to each image you want to show. Now create new empty pages, one for each of your special deals, giving each an appropriate title. If the new pages aren’t already part of the “Our Specials” collection, drag them into that collection using the Site Navigator. When done, your collection should look something like this, containing one page corresponding to each image you want to show.
Of course, you’ll want to fill in each of your pages with text and possibly images or video to help you get your message across. We’ll skip that step for now.
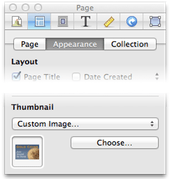 To produce the slide show, we set the thumbnail image for each of your newly created pages to be the image you want for that part of your slide show. Use the Page inspector’s Appearance tab to set the thumbnail. At the bottom of the Page inspector, select “Custom Image…” to set the appropriate slide show image for each page. To produce the slide show, we set the thumbnail image for each of your newly created pages to be the image you want for that part of your slide show. Use the Page inspector’s Appearance tab to set the thumbnail. At the bottom of the Page inspector, select “Custom Image…” to set the appropriate slide show image for each page.
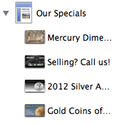 When you are done, you should see tiny thumbnails on each page in the Site Navigator. The important point here is that the thumbnail image of each page will represent that page in the slide show, but the pages themselves do not necessarily need to contain those images. We’ve simply chosen these graphics to represent our specials in the slide show.  When you are done, you should see tiny thumbnails on each page in the Site Navigator. The important point here is that the thumbnail image of each page will represent that page in the slide show, but the pages themselves do not necessarily need to contain those images. We’ve simply chosen these graphics to represent our specials in the slide show. 
Now, let’s put everything together so the thumbnails can be seen in the slide show on the home page.
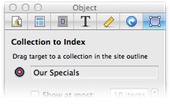 Go back to the home page, and select the placeholder for the slide show in the Web View. Choose the Object inspector — the last icon in the top row in the inspector. Drag the target icon to the “Our Specials” collection the Site Navigator. Now, the slide show should be showing the thumbnails of the pages! Go back to the home page, and select the placeholder for the slide show in the Web View. Choose the Object inspector — the last icon in the top row in the inspector. Drag the target icon to the “Our Specials” collection the Site Navigator. Now, the slide show should be showing the thumbnails of the pages!
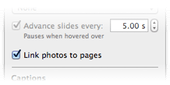 Use the inspector to make any other adjustments you want for the transition effect and navigation controls. Be sure to check “Link photos to pages” so that when your visitor clicks on a particular image, he or she will be taken to the appropriate page. Use the inspector to make any other adjustments you want for the transition effect and navigation controls. Be sure to check “Link photos to pages” so that when your visitor clicks on a particular image, he or she will be taken to the appropriate page.
Check out the demo website using these instructions.
Or download the example Sandvox document that corresponds to this website.
We hope you’ve enjoyed this month's tip!
|
