
Do you remember when you published your first website with Sandvox? All you had to do was figure out what information was needed in each field of the setup area, and provide it. But what do you do when you’re ready to publish your next Sandvox website?
One topic that gets asked about regularly is publishing MULTIPLE websites with Sandvox.
This month, we’ve put together a short primer on this topic to help you take those ideas for additional websites out of the idea stage, and get them published!
Sandvox supports publishing multiple websites to multiple domains. The domain name is the main part of a website’s address. For example, the domain name of http://www.apple.com/mac is apple.com. Sandvox makes it easy to publish to different domains. This is helpful for anyone who wants to have multiple websites for any reason. To publish a new website to a different domain, simply create a new document and set up your host like you did with your first website.
For the purposes of this article, we’re assuming that you have already published your first website with Sandvox. If you haven’t, our publishing help page should get you there. The key thing to keep in mind here is that one Sandvox document equals one host setup.
Now, what if you don’t have another domain? Can you still publish more than one site? The answer is you can, using subfolders.
Subfolders
First things first, what’s meant by a “subfolder” you ask? Simply, any folder that is “below” the top level of the domain.
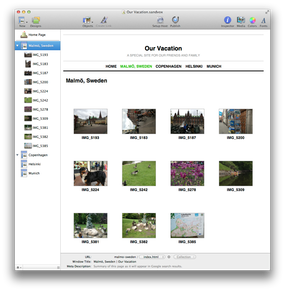
Publishing to a subfolder allows you to publish multiple websites on a single domain. If your website, for example, is MyGreatSite.com, publishing to a “vacation” subfolder will give you a separate address of MyGreatSite.com/vacation for whatever you wish to publish there.
Your subfolder sites can be their own standalone websites, with their own designs, purposes and target audience. They can also, as we’ve seen with some Sandvox users, be part of your main website, with links to sub-sites on various pages or on the Site Menu itself. You may also publish to subfolders when you want to try out a new site before moving to another dedicated domain.
Publish
Publishing a website with Sandvox is easy and quick. To setup publishing for your main site, you just needed to make sure you had all the publishing information from your hosting provider in host setup, then Sandvox could take care of the rest.
At this point, you should create (or open, if you’ve already created) your new Sandvox document intended for a new subfolder — say, your vacation website.
Publishing to a subfolder of an existing website is even easier because Sandvox remembers all the information you provided when you published your other documents. So when you’re ready to publish new material to a subfolder, you really only need to think about one thing: the name of the subfolder you want your content to be published to.
As you did when you published the first time on your main Sandvox document, you need to set up the publishing information for your new document. Start by clicking “Setup Host” from the toolbar to launch the Host Setup Assistant. Choose to publish “On a Remote Host” and click continue. Sandvox will then ask you to type the URL for your new website. As soon as you start typing, Sandvox fills the field with your most recently used URL. If you’ve only published one website, say MyGreatSite.com, the field should have “http://www.mygreatsite.com” or “http://mygreatsite.com”.
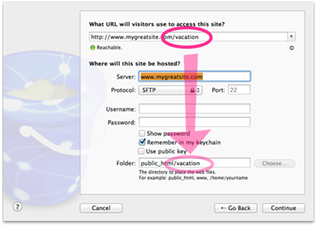
All you have to do is add “/” — if it doesn’t have one already — at the end of the URL and then type your subfolder name (no spaces please!), for example, “/vacation”. After that, hit Return or Tab and Sandvox will fill in the rest of the fields with correct information so you won’t have to worry about filling them out yourself. Just make sure that the subfolder in the URL field matches the subfolder in Folder field. And that’s it!
There’s just one step left to complete. You should run a quick test to make sure there won’t be any publishing issues. To do so, just hit “Continue” and let Sandvox take care of that for you. Once you see “Connectivity test passed!”, click “Continue” then “Done” to close the Host Setup Assistant. Then, you can click “Publish” on the toolbar. And you’re done!
You can repeat these steps for as many subfolders or websites as you wish to create. You can even publish a website to a subfolder of a subfolder!
A Quick Word of Caution: Name Carefully!
As we mentioned earlier, the only thing you really need to think about when setting up your subfolder website is its name. Why is that so important? It is very important to be careful about this, in order to avoid overwriting pages that are at the “top level” of your main website.
For example, if you already have a vacation page in your website with the URL http://www.mygreatsite.com/vacation, publishing a subfolder named “vacation” will overwrite that existing page.
Subsequently, when you re-publish your main website, the published vacation subfolder will be overwritten, because Sandvox will use the information for your website that resides on your Mac and publish it.
So, to avoid troubles, just make sure the subfolder names you create do not already exist on any of your other websites under the same domain name and you should be all set — the slightest of variations should do the trick. If you have a page named “Vacation”, and you want to avoid issues, you should be all set if you use “Vacations” for the name of the subfolder.