

This month, we decided to “talk turkey” on a topic we’re frequently asked about—launching a new Sandvox-built website. We've prepared a short “launch” guide, using an example site to describe the steps involved. We walk through the steps, one-by-one, from “I’m ready to publish” to “my new site is live!” Check it out for our tips and suggestions.
All finished creating your new website? Can’t wait to share it with the world? We understand! Here are the basic steps for a successful launch:
Set Up and Publish
1) Configure Sandvox Host Settings
First, we must tell Sandvox where the website will be hosted by configuring the site’s host settings. This essentially means telling Sandvox what URL your site will be published at, along with your webhost’s login information to complete the publishing upload.

To get started, simply click Setup Host on the toolbar. The Host Setup Assistant sheet appears and asks whether to publish your website to a remote host or to your Mac.
Publishing to a remote host means that a third-party service provider will be handling hosting of your website, whereas publishing to your Mac means that your Mac will serve as the webhost itself. (Publishing to your Mac is a rarely used configuration since it requires your Mac to be always-on and have a known IP address, generally with a registered domain name, a situation that is not typically found on a personal Mac used at home or by a small business.)
A side-note, you can also use Sandvox’s Export menu item to export your site to a folder of your choice and then upload it to your service provider using a third-party FTP or SFTP client.
In this example, we will describe setting up Sandvox to use a service provider to host the new website, which is the most popular choice for our customers.
Since we want Sandvox to do the publishing and uploading for us we choose “On A Remote Host” and press the Continue button.
Next, Sandvox presents a page with a lot of fields to fill out! Don’t let that be a worry—all the information needed here comes from a single source: your hosting service provider. It often comes in a welcome email the provider sends when the account is opened. While every hosting service provider has its own settings, and there is variation among them—Sandvox supports easy use of most of them.
Should you run into trouble, there is a help article that discusses known quirks of some hosting providers.
Once all fields are filled in, click “Continue”.
2) Connectivity Check
At this point, Sandvox runs a quick test to make sure everything that was entered is valid and checks to see if it can publish the new website using the information provided.
If successful, Sandvox will respond with “Connectivity test passed.” If not, you’ll need to “Go Back” and work through the host settings again until the connectivity test is successful.
3) Publish!
Once the connectivity check passes, it is time to publish! To do so, continue through the Host Setup Assistant, clicking Done on the final page.

Then, simply click “Publish” on the toolbar, sit back, and relax. Sandvox will display a publishing sheet where you can monitor its progress. Sandvox will automatically proceed through all of the steps necessary to gather your site’s resources, link up pages and upload the site to your hosting provider.
When it’s done, your site should be ready to go. You’ll see a message from Sandvox that publishing has finished, along with a sharing button
![]() that you can use to tell the world about your new site, or simply visit the selected page to see how it looks in your browser.
that you can use to tell the world about your new site, or simply visit the selected page to see how it looks in your browser.
Tell the World
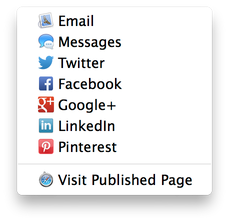
These days, it’s all about social. The built-in sharing button is a super quick way to tell people about your new site through either email, Messages, Twitter, Facebook, LinkedIn, Google+, or Pinterest.
Going forward, whenever it’s time to publish an update to your website, just click the “Publish” button again and Sandvox will upload only the changes that have been made since your website was last published. You’ll also get another opportunity to use that quick sharing button again!
So now that your website is live and accessible to your audience, what else can you do to ensure a successful launch? Time for some web analytics.
Analytics
What are web analytics? In a nutshell, analytics is a frequently used shorthand-term for traffic information about a website. There are tools that you can use to collect, measure, and analyze traffic data created when visitors come to your website. Analytics can tell you helpful things about your website’s visitors such as where they are are from, how many they are, how long they stay on your site or even a specific page, and what they do while they are on your site.
Analytics information can also help you gauge your website’s strengths and weaknesses by telling you which page or section of a site gets the most attention and which one gets the least. Sandvox integrates well with Google Analytics, which is a widely used set of web analytics tools that Google makes available for free.
To setup Google Analytics with your newly published website, use the Document Inspector associated with your Sandvox document. Under Google Tools, click the “Configure…” button. This opens a sheet where you can set up the information that Google needs to track analytics on your site.
But first, you need to get a tracking code that is unique to your site. On the Google Tools sheet associated with your Sandvox document, go to the Google Analytics tab and click the link for Google Analytics. This will open Google’s analytics page where you can create an account, or sign in using an existing Google account.
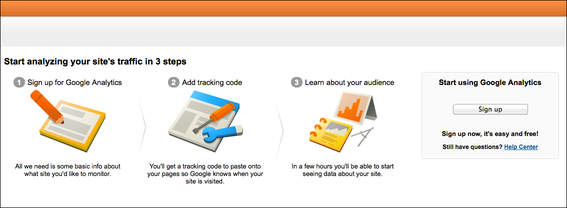
Next, on Google’s web page, click “Sign Up”, and type in the requested information about your site such as its name and URL. After filling out the fields, click “Get Tracking ID” and agree to the terms of the service (if you do). Then, Google will ask for a block of code to be pasted into to every webpage to be tracked with Google Analytics.
Now, shift back over to Sandvox....
Next, copy and paste the code from Google into the large Google Analytics text area at the bottom of the sheet. By incorporating the tracking code here, Sandvox will take care of adding the code to each page of your website. Click “Done” to close the sheet.
To finish the process, publish your site again by simply clicking “Publish” on the toolbar to make sure that the new analytics code gets uploaded to your new site. That’s it!
To view analytics information for your website, wait 24-48 hours and then login to Google Analytics and click the “All Web Site Data” link under your website account, which takes you to the reporting page of your account. Information about site traffic and visitor behavior is presented in many different ways, with visuals and accessible options to drill-in to detailed data. For more information about Google Analytics, read through their help materials.

With these basic steps and friendly tips, you should have no trouble achieving lift-off for any Sandvox-built website.
Remember, launching is only the beginning, not the end. We wish you much success in growing an audience and building a loyal following. Cheers!
Images courtesy NASA