

Ever tried to drag an inline image up or down to place it in the middle of some text while working on a Sandvox website? Did you see the checkbox “object causes wrap” in the inspector? The Wrap Inspector is the key to how objects are positioned on a page, and how text wraps around those objects.
We put together this short article to explain some of the fine points of the Wrap Inspector, to help you take advantage of all that it can do.
The Wrap Inspector lets you control where objects are placed on a page and how they will interact with the text around them.
What is Wrapping?
When you place an object (an image, movie, sharing button, etc.) onto the main area of your page, you can decide how you want text to wrap around it. You can choose to make the text stay only above and below, or on one side of an object. To set these options, you use the Wrap Inspector.
In order to control wrapping of text around an object, first make sure that in the Wrap Inspector that the object is set to “Inline (moves with text).” Wrapping controls do not apply to objects placed in the sidebar or as callouts.
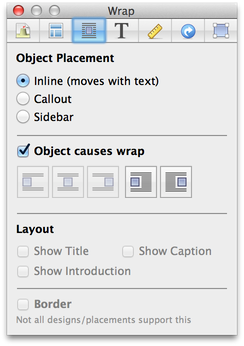
For an object that is placed “inline,” the next step is to determine how it is positioned. Images can have the “Object causes wrap” checkbox turned on or off — this determines whether or not an image appears on a separate line from the preceding and following text paragraphs — and can be positioned on the left or right side with text flowing around them. Other object types automatically have the “Object causes wrap” checkbox checked, and don’t allow text to flow around them. (If you want a similar effect, just switch the object positioning to “Sidebar.”)
Let’s say we select an image from a page and choose the rightmost icon ![]() . The image will move to the right of the page, if it isn’t there already, and the text will wrap to the top, left, and bottom of the image. The image will move up or down as you add or delete text, but it will not move horizontally. To manually set the vertical position of the image, just drag it up or down.
. The image will move to the right of the page, if it isn’t there already, and the text will wrap to the top, left, and bottom of the image. The image will move up or down as you add or delete text, but it will not move horizontally. To manually set the vertical position of the image, just drag it up or down.
Pro Tip: Using the Wrap Inspector, you can disable wrapping entirely for inline images. When would you do this? Say you want to include a small image or icon, or even a set of icons, directly within the text itself, that is, without any gap between the text and the images themselves. By turning “Object causes wrap" off you can align images next to each other — this isn’t normally possible when those images all “wrap.”
Getting the Right Wrap
As you experiment with wrapping, you might find that when you try to drag an inline image or a callout up or down to place it in the middle of some text, it doesn’t behave as expected and instead moves to the top or bottom of the page.
This happens because Sandvox wraps objects after paragraph breaks. To manipulate the placement of an image, write shorter paragraphs or break up the text using a paragraph break. (You can insert a paragraph break using the Return key.)
With shorter paragraphs, you’ll be able to more closely control where images are placed and how they wrap with respect to nearby text.
Layout Options
Don’t forget that the Wrap Inspector also allows you to add titles, introductions, captions, and borders to selected objects. These layout options can be enabled for both callout and sidebar objects. For inline objects, only captions can be enabled. Keep in mind that whether a border is ultimately displayed and how it appears is ultimately determined by the design that you’ve chosen for your site.
May your wrapping—or unwrapping—fill you with joy this holiday season.