Blogging with Sandvox
Introduction
Blogging with Sandvox is very simple. In addition to creating a written blog, you can use this feature to add a podcast or videocast to your site. However, it may not be entirely obvious how to get started with a blog. This article serves as a guide to creating and maintaining a blog with Sandvox.
Creating the Blog
When you think about it, a blog is simply a collection of webpages, ordered by date. Therefore, that is exactly what we shall be creating. Fortunately Sandvox has a handy template to get you started.
To create a new blog:
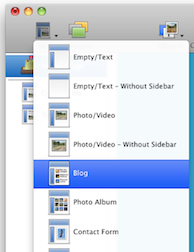
- Select the Home Page in the Site Navigator.
-
Click the "New" item in the toolbar and choose "Blog."
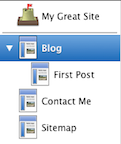
- Now you can click on your new Blog in the Site Navigator and give the blog a suitable name by setting the "Page Title."
Congratulations, you now have a new blog! You should end up with something in the Site Navigator like this:
Adding Content to the Blog
Now your blog is all set up, it's time to add some content to it!
Your new blog already has a 'first post' page; to edit the text just click and begin editing.
To add a new entry to the blog:
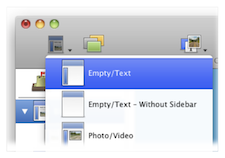
- Select the blog in the Site Navigator.
-
Click the "New" item in the toolbar and select "Empty/Text"
You can now begin writing in this page to create a blog entry. Don't forget that you can easily add images or callouts to the page's content.
Publishing the Blog
Simply click the "Publish" item in the toolbar. If needed, Sandvox will prompt you to run through the Host Setup Assistant, and then you'll be ready to publish.
RSS Feed
Of course, half the point of a blog is that people can subscribe to it. This is done through an RSS feed. Sandvox automatically creates and maintains a blog's RSS feed.
You want visitors to find the RSS feed for your blog easily. Visitors can click on the badge to view the RSS feed. You can also attach an RSS Badge to an existing blog.
To add an RSS Badge to a blog:
- Select the blog in the Site Navigator.
- Click the "Objects" item in the toolbar and select "RSS Badge."
- Open the Object Inspector and customize the new RSS Badge as you like.
Archives
Once your blog grows to more than a few entries, it is often useful to have a full archive available. Sandvox easily creates a month-by-month archive using the Collection Archive Object.
To set up a blog archive:
- Select your blog in the Site Navigator.
- Click the "Objects" item in the toolbar and select "Indexes > Collection Archive."
- Select the newly created archive object and open the object Inspector. Ensure that it is connected to your blog page.
- Publish the site.
Alternatively, you can set up a blog archive by checking the "Publish archives" box in the Collection Tab of the Page Inspector.
Further Ideas
Of course, you don't have to leave it at that with your blog. Here's some ideas for further things to do.
Experiment with Content
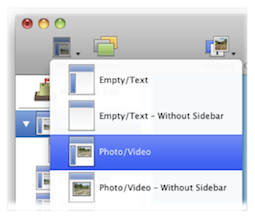
Normally when adding to your blog, you use simple Text pages, but don't stop there! If you are making a post about a photo or a movie you've created, why not use a Photo/Video page instead?
Don't forget that you can also easily create such pages by dragging a photo or movie (from the Media Browser or another application such as the Finder) into the Site Navigator. Once you've created the page, click to add some text to it.
If you're feeling adventurous, experiment with integrating Raw HTML and other objects into blog posts!
Comments
Why not enable comments on your blog? [Comments allow your readers to leave behind their thoughts on items you post.
When you first create the blog, Sandvox automatically prepares it for comments. All you have to do is select one of our comment providers in the Document inspector as described in the "Comments" article.
Better Summaries
When you first create a blog, the main blog page is set to show the twenty most recent articles, along with a full summary of their content. If you tend to write quite long blog entries, you may find that this results in too much content on the page.
One way to save space is to simply reduce the number of recent articles displayed:
To set the number of recent blog items displayed:
- Select the blog in the Site Navigator the click on the body of the page itself.
- Open the object inspector to view the settings.
-
Set the "Show at most" box to a more appropriate number.
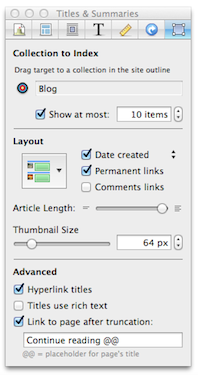
An alternative is to set the "article length" of each article so that it takes up less space. If you wish, you can even make use of custom summaries. This allows you to completely separate the summary text of an article from the actual text of its corresponding page.
For more information on custom summaries and summaries in general, please see the "Summary" article.
Dates
When you first create a Blog, it is set to automatically display the date on each page. What you may not know though, is that you can change whether the creation or modification date of the page is displayed. You can do this via the Date Created-Date Modified drop down in the Appearance Tab of the Page Inspector.
You can also change the format the date is displayed in. For information on this, please see the "Dates Format" section of the "Document Inspector: Site Tab" article.
Blog Maintenance
Sandvox maintains its blog entirely from the site document, so it's not possible to update your blog remotely unless you have your Mac and your Sandvox document with you. Moreover, Sandvox does not integrate with other blogging tools such as WordPress or Blogger; they maintain their own database on their servers, and are not Mac-based.
Keywords: blog, blogger, blogging, weblog, web, log, logs, blogs, rss, atom, feed, feeds, link, links, linking, subscribe, subscription, make, making, home, page, how, to, add, adding, picture, pictures, photo, photos, image, images, graphic, graphics, word, press, wordpress, moveable, type
