Alternate Hosting
This article is part of the "Host Setup Assistant" procedure, and is for you if you are publishing your site to a host other than Sandvox Hosting.
Host Settings
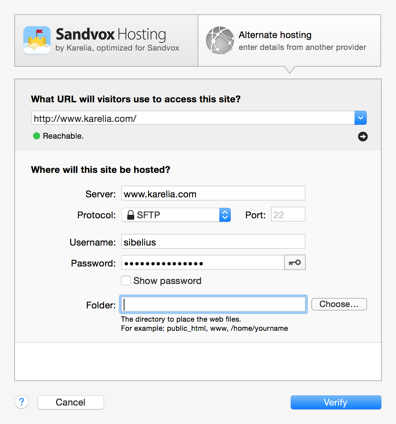
Sandvox will ask you to enter your host settings like this:
Remember that all of the settings you need to set up your site for publishing should be provided by your host. You may need to contact them if you are missing anything.
Sandvox will automatically fill in fields based on previous settings when it can.
URL
The address that visitors will view your site at. Generally, something like this:
http://www.example.com
If you are setting up a brand new website, your domain name may not yet point to your host (or you may not even have bought one yet!). If so, you can still enter the domain here and when Sandvox fails the connection test, just ignore it for the time being. We recommend that once the domain is properly connected you run the Host Setup Assistant again to ensure everything is correct.
Some hosts also provide a link to your account as a subdomain of their website and you could perhaps enter that URL here instead.

As you type the URL of your website, Sandvox tests it. There are, roughly four possibilities:
- Green light
- Sandvox was able to connect to a web server at the URL, and it appears to be behaving properly.
- Yellow light
- Sandvox only had partial success with the URL; it may not be available from elsewhere on the Internet.
- Red light, redirect
-
Sandvox was able to connect to a web server at the URL, but it redirected somewhere else. This could be because:
- The domain is owned or registered by someone else. You'll need to pick another domain or purchase it from them.
- You've purchased the domain but still need to correctly set the DNS records for it.
- You've purchased the domain and set DNS records for it, but they just haven't had enough time to propagate yet. Try again later, or ignore the error.
- The URL is simply misspelt slightly.
- Red light, error
- Sandvox couldn't contact a web server at the URL. Some possible reasons are the domain not having been registered yet, a misspelling, or your internet connection being down.
Clicking on the arrow on the righthand side will open the URL in your default web browser.
Server
The address of the server to connect to when publishing your site. Your host might instead refer to this as:
- "Hostname"
- "Host name"
The hostname might be basically the same as the URL Format like so:
example.com
or to your hosting provider:
examplehost.com/john
Hosts vary on how they handle the format for the server and the URL. You can refer to this help article for known quirks of specific hosts.
Protocol and Port
The method by which the site will be uploaded to your host. Sandvox supports both secure and insecure variants of FTP and WebDAV. The relative security of different protocols is indicated in the popup by a padlock icon.
In general, we prefer it if you use SFTP or one of the other secure protocols (indicated by a "lock" icon). However, your host may not support that. They should tell you which methods they support.
Note that these upload methods are not completely interchangeable. There may be some hosts where you can only access the directory you need to upload your files into via SFTP, not FTP. The reason for this is that FTP usually gives you access only to your personal home directory (and any files and folders in it), whereas SFTP generally gives you access to the whole computer's directory of files and folders (as long as your user account has privileges to access those!) And often with WebDAV, only certain directories can be accessed, perhaps not even your entire home directory. So if the directory where HTML files are served from is not in your home directory, SFTP may be the only solution.
Sandvox automatically fills in the "Port" field for you. You should only change this value if your host specifically requires you to.
Username
The username is your identifier for logging into the Host server. Your host may instead refer to this as:
- "Account ID"
- "User ID"
Password
Your password for logging into the Host server.
If you have chosen SFTP as your upload method, then you can click the key button to use a public key instead of a password. Please see the "Uploading using SFTP" article for information on this.
You can check the "Show password" box, when you're sure no one is watching, to make sure that you're typing the password right.
Sandvox will save your password in your keychain so that each time you publish, you won't have to re-enter the password.
If you have a public key established for connecting to your server, you can click they "key" icon and choose your public key and use that instead of a password.
Folder
Also known as the document root. Type the folder name here. (This information should have been supplied by your host when you initially set up service.)
If you don't know the name of your document root directory, click the "Choose…" button.
It will take a moment for the next window to open. If all of the information you've entered is correct, the window that opens will show you the folders available to you on your external host. There should only be a few directories to choose from, and one of these is the folder in which your web site will be stored.
The document root is often, but by no means always a directory called "www". Your host may use a different name (such as htdocs, httpdocs, html, public_html, or web).
While connecting, Sandvox might encounter an invalid certificate and prompt you about that.
When entering settings for alternate hosting, Sandvox allows you to publish more than one site to a single host.
Next Step
Once this information has been entered, click the Verify button to test your connection. (If you were unable to pass the tests but still want to try to upload your site, option-click on the button.)
If the connection test fails, you will need to fix your settings. Here's some insight as to why connection tests may fail.
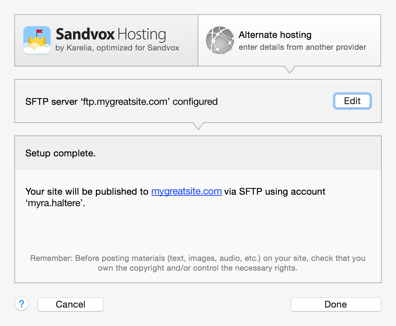
If the connection tests pass, the details will be replaced with a summary of your connection information. If desired, you can click "Edit" to change these settings; otherwise click "Done" to exit the Host Setup Assistant.
Keywords: publish, publishing, remote, host, setting, settings, setup, set, up, set-up, step, steps, ftp, ftps, sftp, webdav, secure, url, format, hostname, host, name, upload, method, uploading, port, username, user, name, password, document, root, doc, sub, folder, subfolder, domain
